The GATE to golf (or – How to turn a hopeless slice into a semi-professional looking swing )
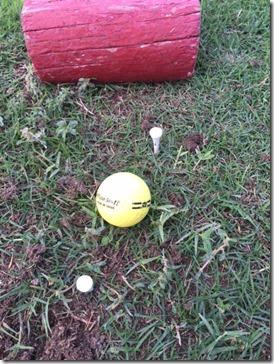
This post is about a simple training device – known as ‘the Gate’ – which consists of nothing more than two tees placed on the ground. Placed in a specific manner, so that they form a ‘gate’ (surrounding the ball). The two white tees and their relative placement – are shown in the image below.
The exact distance between the tees is not critical – it can range from a foot to a little more or a little less. The crucial thing however is the relative position of the tees. The closer tee (closer to your body) needs to be AHEAD of the other tee (see the picture below). This is ALL that is needed to create this simple training device (known as the ‘gate’ – originally revealed by J.Douglas Edgar in his classic ‘The Gate to Golf’).
Do not let the simplicity of the device fool you. As I will show in this post – this little gem can cure everything from a slice (by aligning the body correctly) – to first tee jitters – to those tight chips. Don’t believe me? Try the tips in this post for yourself.
 |
The Body Aligns Itself Automatically
Your first task is to align your body with the gate. Specifically, this means:
- Left arm aligned with the gate (i.e. aligned with the straight line connecting the two tees). Effectively – your left arm should be pointed at 7 ‘ O Clock (with your NOSE pointing to 6 ‘ O Clock).
- Left back (upper) and Right back (upper) aligned with the gate. Too often, poor shoulder alignment affects most amateurs during their setup routine. In reality, aligning shoulders is not an easy task – even for pros. If you use your upper back to guide you during this alignment, you will be a step ahead of trying to do this any other way. The Upper back, in any case, is just a continuation of the shoulder muscles – if you prefer you can visualize the shoulder muscles on the back – and align those instead.
- How far from the ball should you stand? This question puzzled me as a beginner – and I asked it of every coach I worked with. I did not get a single satisfactory answer. The actual answer is a lot easier. Essentially, the lie of the club will provide you with this answer. You see, the clubface needs to be GROUNDED correctly (squarely). Once you GROUND the club, the shaft will rest at a particular angle. Now, just place your hands on the grip – and you are at the correct distance from the ball ! In other words, if the clubface is NOT correctly grounded, the shaft will pull you closer or further from the ball – because it will be ANGLED incorrectly. With correct grounding, you use the club in the manner it was intended to be used.
When faced with the simple task of swinging through a LARGE opening on the ground, the body is relaxed. The task at hand seems easy. In addition, the BODY seems to want to align itself with the gate. The left arm should appear to be in-line with the gate (pointed straight at the gate). The right back should be aligned with the gate as well (more on this below – in ‘the Right Elbow’). These checkpoints appear auto-magically – even if you do not attempt to align them so. This is the power of changing the focus from ‘hitting a small ball’ to ‘swing through a fairly large opening’.
The Right Elbow
The tucking in of the right elbow is an important aspect of the backswing.
When you align your right back with the gate, the right side is PRIMED to ‘fold back’ on the backswing.
As the right back ‘folds back’, the right elbow necessarily stays stuck to the right side, providing you with a powerful coil (to read more about the coil, try this tip) – and more importantly, an inside to out attack path. At the top of your backswing, you should feel ready to unleash (uncoil) your coiled up back muscles. You need not have the physique of a professional golfer – this coiling is easily achievable – provided you maintain your spine angle.
Gate, Gate Everywhere – even on the golf course ( for every shot )
Once you get used to practicing with the gate on the range, you need to be able to transfer that visual imagery to the golf course. You need to be able to ‘see’ two tees in the ground – instead of the ball. This is where the true power of the gate will become evident. Once you visualize this gate, a few things happen without your even trying:
- Body Alignment – Regardless of the shot you are facing, as long as you ‘create’ your imaginary gate around the ball – your body will align itself to the path that it needs to swing on. The gate is a large enough ‘alignment aid’ for the body to work with.
- Elimination of ‘fear’ – For a lot of us, a tough tee shot can lead to a tensing up of the body – or too many swing thoughts. Underlying these negative thoughts is ‘fear’. Rather than taking a psychological approach to overcoming this fear, one can try a simple, physical approach. Simply trick the mind into thinking that there isn’t really a ball to hit. That the club needs to be swung through a GATE – the gate providing a LARGER hitting target than a small ball. This LARGE target is what helps alleviate fear. The ‘hitting’ of the ball will happen automatically if you swing through the gate..
- The Tight Chip Shot – Visualizing the ‘gate’ works equally well for the short game. For your next chip – try and visualize ‘chipping through the gate’ – instead of chipping AT the ball.
Why is this device so effective?
Modern day golfers take for granted that the club has to come in from an inside-out path. Any instructor anywhere in the world – will tell you the same.
However, the first person to discover and publicize this was a golfer named ‘J Douglas Edgar’ (who was a leading golfer of his time – but died prematurely).
He did more than point to the correct path – he showed a simple way to actualize this ‘inside out’ path – by proposing his gate (his gate was a little more involved than two tees in the ground…but the concept remains unchanged). The gate was the physical manifestation of the ‘inside out’ concept.
The Dreaded Slice
Today, there isn’t a single professional golfer (or low handicap golfer) who doesn’t follow the ‘inside-out’ path. Conversely, most amateurs follow an outside-in path.
The bane of the weekend golfer – the dreaded slice – is a consequence of the (incorrect) outside-in swing path.
Fortunately, the gate can rescue the weekend golfer’s slice.
Imagine not just curing your slice – but developing a somewhat pro-like swing – using a device as simple as two tees in the ground! When I coach beginners (friends and family), I start them off with just this device – and let them hit buckets and buckets of balls – with a single focus – ‘Swing through the gate’. Without realizing it, they learn to play ‘passable’ golf – short-circuiting all the intricacies of posture, arm tension, alignment etc. Such is the power of this device.
Give ‘the gate’ a try – and let me know if it works for you.

I like the idea of the “gate”, but surely if the gate is a foot wide, it will be possible to swing through it out to in.
You would be surprised at how often we swing ‘out to in’. The idea of the gate is to make it second nature to swing in-to-out. Also, if a foot wide seems too easy, simply decrease the gate width. Decreasing results in even ‘crisper’ shots. For me, almost 10 years ago, when I first discovered the gate, I gained a nice, slow draw, which I have to this day. All thanks to the gate!
Also, the golf channel (Martin Hall) did a segment on the gate; and used MY technique (two tees in the ground), without acknowledging either my blog or me. 🙁
Happy golfing….
Hey, good stuff here, thanks so much. Can you explain further on how to align the shoulder or upper back to the gate? Should they be open or closed or square? I guess I’m having a hard time visualizing this …
Thanks!
I like to visualize my chest (specifically my sternum), moving through the gate, at impact. If you approach the ball (during setup), with this image in mind, it should align your shoulders and chest correctly.
I wrote a couple of posts about alignment, that might be useful
Feet based alignment
https://www.anujvarma.com/a-simple-really-simple-alignment-technique/
Shirt button based alignment
https://www.anujvarma.com/alignment-in-golf/
Happy golfing!